一、背景
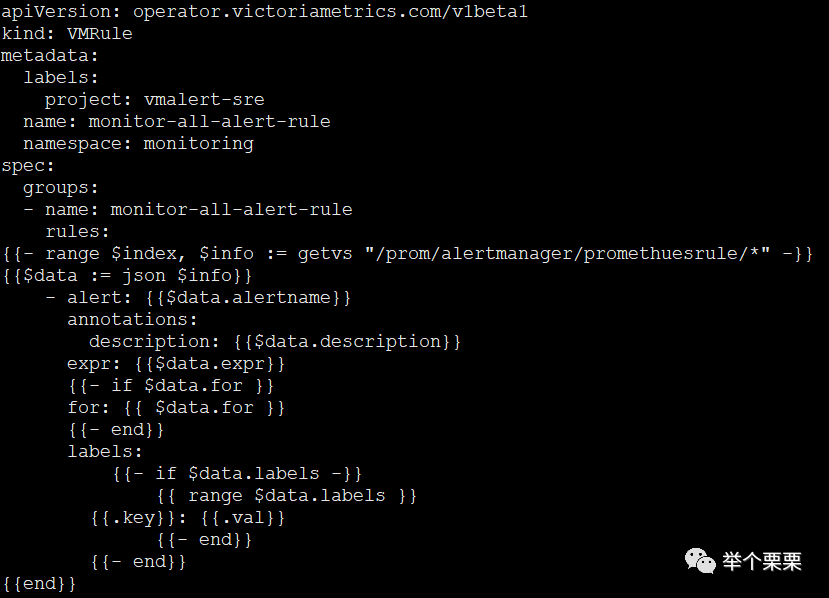
由于我们将监控系统从Thanos架构迁移到VictoriaMetrics架构(以下简称VM),需要将原来的告警规则apply到新的VM集群中。但是不同的地方在于,需要将告警规则(559条)从原来的多个配置文件中全部梳理出来后整理成以单条规则的形式录入到etcd中,以key-values的形式存放。然后通过confd自动生成yaml文件后再apply到VM集群中生效。这么做的原因是公司有个开发的监控前端,对接etcd来实现告警规则的增删改查功能。对比如下:
Thanos架构下的规则,直接编辑yaml文件增删改查告警规则后apply生效:
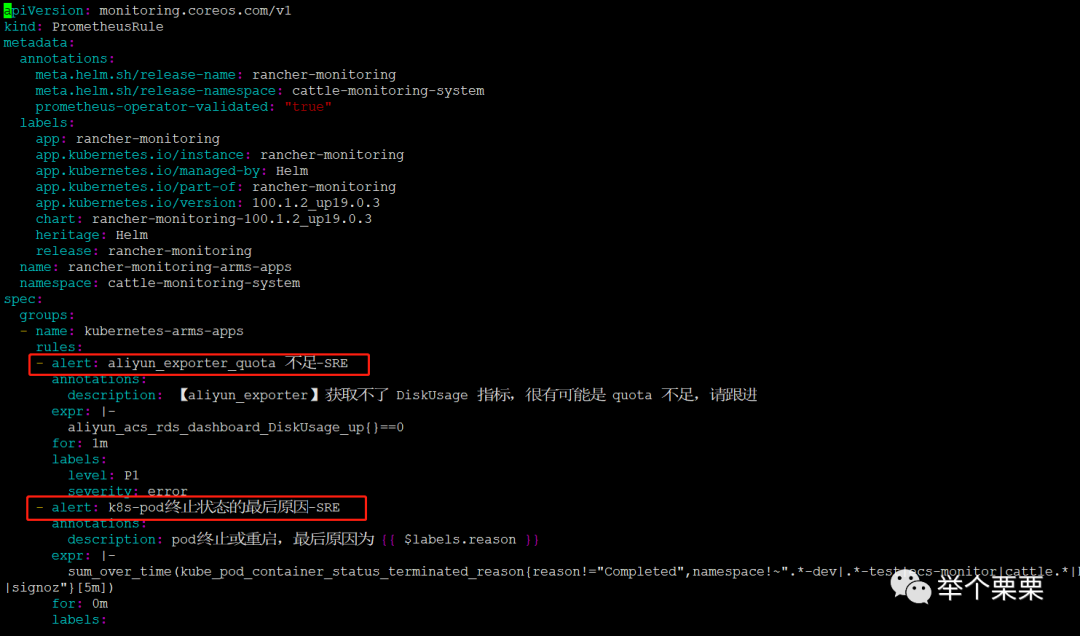

VM架构下的规则,将如上图的yaml文件规则一条条剥离出来后转换为json格式后,再修改label对应的字段。最终put到etcd中。
最终,通过confd生成yaml文件后apply到VM集群。
二、需求
根据如上背景,需求如下:
1)将原来包含多条告警规则的多个yaml文件的规则进行汇总到一个yaml文件中;
2)将这个yaml文件的告警规则根据alert名称生成单独的文件,即:每条告警规则一个yaml文件;
3)将生成的单条告警规则的yaml文件转换成对应的json文件;
4)将json文件进行内容替换,达到符合confd模板的格式;
5)将修改后的json文件批量PUT到etcd中,验证规则是否生效。
第一步:比较简单但是繁琐,需要粗略看下yaml文件,手工统一处理中文字符和特殊字符,修改alert的名字为唯一:
# sed -i '/name:/d' *# sed -i '/rules:/d' *# sed -i -e 's/- alert:/ alertname:/g' -e '/annotations:/d' -e 's/ description:/description:/g' *.yaml# sed -i '/summary:/d' *.yaml# sed -i '/runbook_url:/d' *.yaml# sed -i 's/ message:/message:/g' *.yaml# sed -i 's/message:/description:/g' *.yaml最后直接将多个yaml文件cat到一起即可。主要是中间的三步。
三、实现
第二步:将这个yaml文件的告警规则根据alert名称生成单独的文件,即:每条告警规则一个yaml文件:
这一步的实现也相对简单,通过awk工具一次性即可解决:
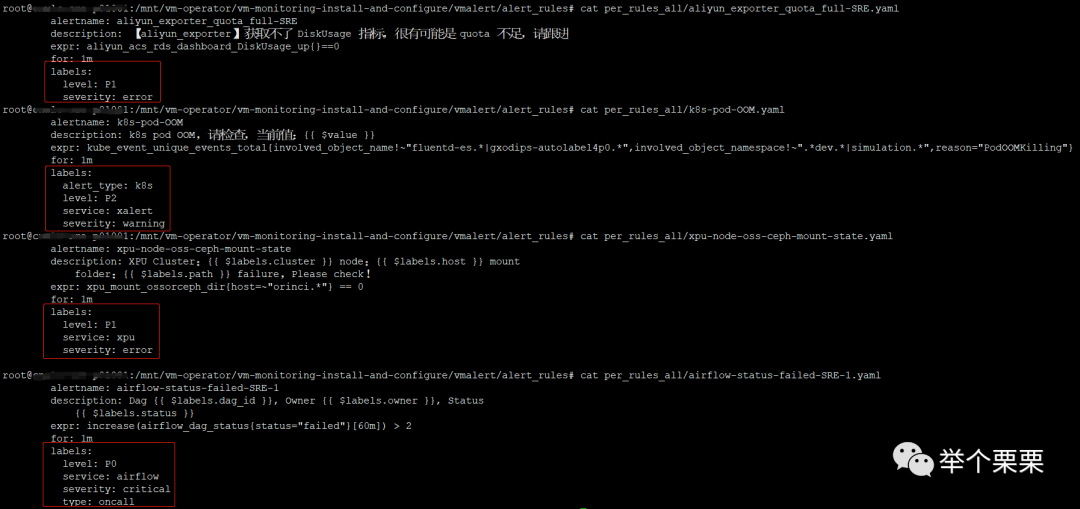
// 生成以告警名称为文件名的单条规则的yaml文件# awk '/alert:/{close(f); f=$3".yaml"; print $0 > f;next} {print $0 > f}' *.yaml// 或者生成随机文件名# awk '/alert:/{close(f); f=srand(3)".yaml"; print $0 > f;next} {print $0 > f}' *.yaml// 查看生成后的其中一条告警规则# cat xpu-node-oss-ceph-mount-state.yaml alertname: xpu-node-oss-ceph-mount-state description: XPU Cluster:{{ $labels.cluster }} node:{{ $labels.host }} mount folder:{{ $labels.path }} failure,Please check! expr: xpu_mount_ossorceph_dir{host=~"orinci.*"} == 0 for: 1m labels: level: P1 service: xpu severity: error说明:awk循环整个yaml文件逐行读取,匹配到alert关键字后取出告警名称作为文件名后将后续内容写入到改文件中。如此循环即可。也可以生成随机文件名。
第三步:将生成的单条告警规则的yaml文件转换成对应的json文件:
这一步中在网上找了一个yaml和json格式互转的python程序,直接拿来主义使用了:
https://blog.csdn.net/aidijava/article/details/125630629程序来源:https://blog.csdn.net/aidijava/article/details/125630629
#!/usr/bin/python# -*- coding: UTF-8 -*-import yamlimport jsonimport osfrom pathlib import Pathfrom fnmatch import fnmatchcase

class Yaml_Interconversion_Json:    def __init__(self):        self.filePathList = []        # yaml文件内容转换成json格式    def yaml_to_json(self, yamlPath):        with open(yamlPath, encoding="utf-8") as f:            datas = yaml.load(f,Loader=yaml.FullLoader)          jsonDatas = json.dumps(datas, indent=5)        # print(jsonDatas)        return jsonDatas
    # json文件内容转换成yaml格式    def json_to_yaml(self, jsonPath):        with open(jsonPath, encoding="utf-8") as f:            datas = json.load(f)        yamlDatas = yaml.dump(datas, indent=5)        # print(yamlDatas)        return yamlDatas
    # 生成文件    def generate_file(self, filePath, datas):        if os.path.exists(filePath):            os.remove(filePath)          with open(filePath,'w') as f:            f.write(datas)
    # 清空列表    def clear_list(self):        self.filePathList.clear()
    # 修改文件后缀    def modify_file_suffix(self, filePath, suffix):        dirPath = os.path.dirname(filePath)        fileName = Path(filePath).stem + suffix        newPath = dirPath + '/' + fileName        # print('{}_path:{}'.format(suffix, newPath))        return newPath
    # 原yaml文件同级目录下,生成json文件    def generate_json_file(self, yamlPath, suffix ='.json'):        jsonDatas = self.yaml_to_json(yamlPath)        jsonPath = self.modify_file_suffix(yamlPath, suffix)        # print('jsonPath:{}'.format(jsonPath))        self.generate_file(jsonPath, jsonDatas)
    # 原json文件同级目录下,生成yaml文件    def generate_yaml_file(self, jsonPath, suffix ='.yaml'):        yamlDatas = self.json_to_yaml(jsonPath)        yamlPath = self.modify_file_suffix(jsonPath, suffix)        # print('yamlPath:{}'.format(yamlPath))        self.generate_file(yamlPath, yamlDatas)
    # 查找指定文件夹下所有相同名称的文件    def search_file(self, dirPath, fileName):        dirs = os.listdir(dirPath)         for currentFile in dirs:             absPath = dirPath + '/' + currentFile             if os.path.isdir(absPath):                 self.search_file(absPath, fileName)            elif currentFile == fileName:                self.filePathList.append(absPath)
    # 查找指定文件夹下所有相同后缀名的文件    def search_file_suffix(self, dirPath, suffix):        dirs = os.listdir(dirPath)         for currentFile in dirs:             absPath = dirPath + '/' + currentFile             if os.path.isdir(absPath):                if fnmatchcase(currentFile,'.*'):                     pass                else:                    self.search_file_suffix(absPath, suffix)            elif currentFile.split('.')[-1] == suffix:                 self.filePathList.append(absPath)
    # 批量删除指定文件夹下所有相同名称的文件    def batch_remove_file(self, dirPath, fileName):        self.search_file(dirPath, fileName)        print('The following files are deleted:{}'.format(self.filePathList))        for filePath in self.filePathList:            if os.path.exists(filePath):                os.remove(filePath)          self.clear_list()
    # 批量删除指定文件夹下所有相同后缀名的文件    def batch_remove_file_suffix(self, dirPath, suffix):        self.search_file_suffix(dirPath, suffix)        print('The following files are deleted:{}'.format(self.filePathList))        for filePath in self.filePathList:            if os.path.exists(filePath):                os.remove(filePath)          self.clear_list()
    # 批量将目录下的yaml文件转换成json文件    def batch_yaml_to_json(self, dirPath):        self.search_file_suffix(dirPath, 'yaml')        print('The converted yaml file is as follows:{}'.format(self.filePathList))        for yamPath in self.filePathList:            try:                self.generate_json_file(yamPath)            except Exception as e:                print('YAML parsing error:{}'.format(e))                 self.clear_list()
    # 批量将目录下的json文件转换成yaml文件    def batch_json_to_yaml(self, dirPath):        self.search_file_suffix(dirPath, 'json')        print('The converted json file is as follows:{}'.format(self.filePathList))        for jsonPath in self.filePathList:            try:                self.generate_yaml_file(jsonPath)            except Exception as e:                print('JSON parsing error:{}'.format(jsonPath))                print(e)        self.clear_list()
if __name__ == "__main__":    dirPath = '/mnt/vm-operator/vm-monitoring-install-and-configure/vmalert/alert_rules/per_rules_all'    fileName = 'rules_json.yaml'    suffix = 'yaml'    filePath = dirPath + '/' + fileName    yaml_interconversion_json = Yaml_Interconversion_Json()    yaml_interconversion_json.batch_yaml_to_json(dirPath)    # yaml_interconversion_json.batch_json_to_yaml(dirPath)    # yaml_interconversion_json.batch_remove_file_suffix(dirPath, suffix)
转换如下:
// 将yaml转换成json# python3 yaml_to_json.py# cat xpu-node-oss-ceph-mount-state.json { "alertname": "xpu-node-oss-ceph-mount-state", "description": "XPU Clusteruff1a{{ $labels.cluster }} nodeuff1a{{ $labels.host }} mount folderuff1a{{ $labels.path }} failureuff0cPlease checkuff01", "expr": "xpu_mount_ossorceph_dir{host=~"orinci.*"} == 0", "for": "1m", "labels": { "level": "P1", "service": "xpu", "severity": "error" }}第四步:将json文件进行内容替换,达到符合confd模板的格式:
最后,也是这个文本处理中最难的一部分。需要将json格式内容:
{ "alertname": "xpu-node-oss-ceph-mount-state", "description": "XPU Clusteruff1a{{ $labels.cluster }} nodeuff1a{{ $labels.host }} mount folderuff1a{{ $labels.path }} failureuff0cPlease checkuff01", "expr": "xpu_mount_ossorceph_dir{host=~"orinci.*"} == 0", "for": "1m", "labels": { "level": "P1", "service": "xpu", "severity": "error" }}转换为:
{ "alertname": "xpu-node-oss-ceph-mount-state", "description": "XPU Clusteruff1a{{ $labels.cluster }} nodeuff1a{{ $labels.host }} mount folderuff1a{{ $labels.path }} failureuff0cPlease checkuff01", "expr": "xpu_mount_ossorceph_dir{host=~"orinci.*"} == 0", "for": "1m", "labels": [ {"key": "level","val": "P1"}, {"key": "service,"val": "xpu"}, {"key": "severity,"val": "error"} ]}这里需要说明一下的,每条规则的labels个数可能不一样,并且内容可能也不一样。比如:
使用sed工具来实现批量替换:
// 将所有json文件内容进行sed替换# sed -i -n '{H:loopn;H/^}/{x;p}/labels":s*{/!b loopxs/labels":(.*){/labels":1[/g;H:loop1ns/"(.*): (.*)"(.*)/{"key": "1,"val": 2"}3/H/     }/!b loop1xs/     }/     ]/g;Hb loop} ' *.json
// 查看生成后的文件# cat xpu-node-oss-ceph-mount-state.json     }     "labels": {
{     "alertname": "xpu-node-oss-ceph-mount-state",     "description": "XPU Clusteruff1a{{ $labels.cluster }} nodeuff1a{{ $labels.host }} mount folderuff1a{{ $labels.path }} failureuff0cPlease checkuff01",     "expr": "xpu_mount_ossorceph_dir{host=~"orinci.*"} == 0",     "for": "1m",     "labels": [          {"key": "level","val": "P1"},          {"key": "service,"val": "xpu"},          {"key": "severity,"val": "error"}     ]}
// 删除每个文件多余的前3行# sed -i '1,3d' xpu-node-oss-ceph-mount-state.json{     "alertname": "xpu-node-oss-ceph-mount-state",     "description": "XPU Clusteruff1a{{ $labels.cluster }} nodeuff1a{{ $labels.host }} mount folderuff1a{{ $labels.path }} failureuff0cPlease checkuff01",     "expr": "xpu_mount_ossorceph_dir{host=~"orinci.*"} == 0",     "for": "1m",     "labels": [          {"key": "level","val": "P1"},          {"key": "service,"val": "xpu"},          {"key": "severity,"val": "error"}     ]}
最终实现了格式的转换。这里延伸一下,简单介绍一下sed的原理和说明这部分sed的实现:
sed有两个空间:模式空间(pattern space);交换空间(hold space 保持空间)
- 模式空间:容纳当前行的缓冲区,即通过
模式匹配到的行被读入该空间中 - 保持空间:一个辅助缓冲区,可以和模式空间进行交互(通过h,H,g,G),但命令
不能直接作用于该空间,在进行数据处理时作为“暂存区域”
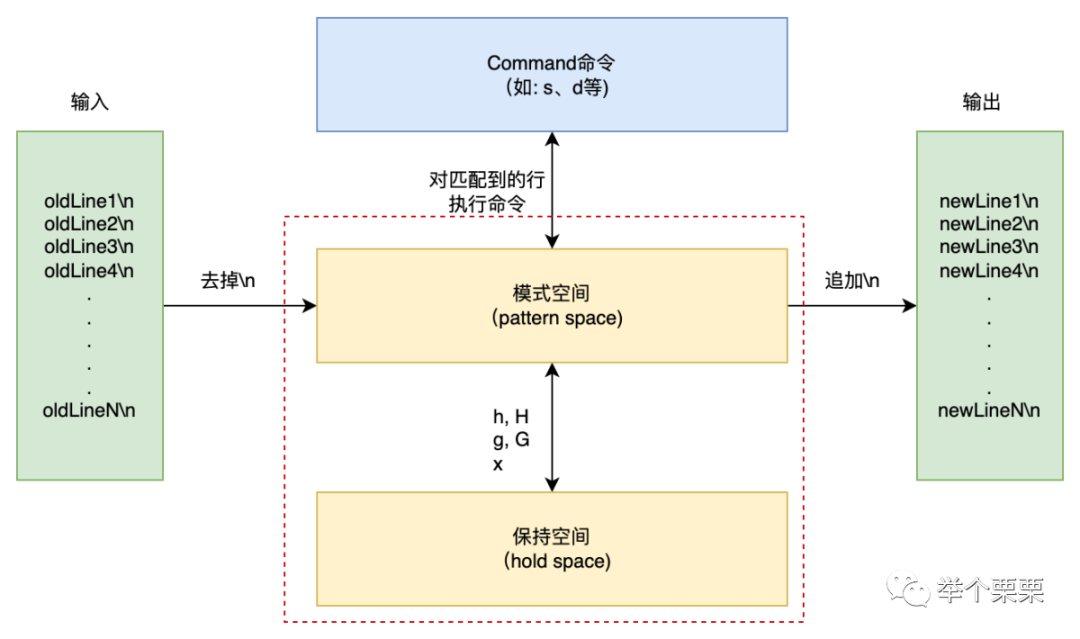
执行步骤如下:
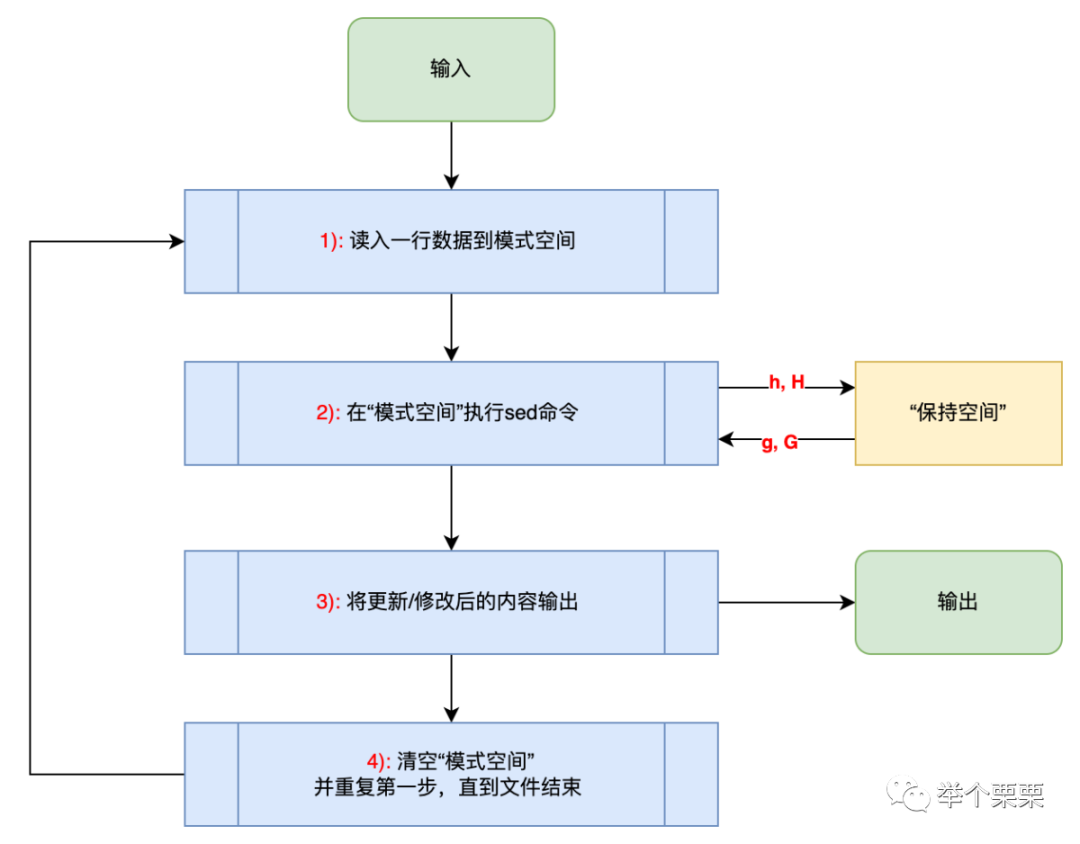
指令:h,H,p,P,x
交换空间
h: 用模式空间内容覆盖交换空间
H: 将模式空间内容追加到交换空间
p/P: 模式空间输出
x: 交换空间&模式空间内容交换
g: 将交换空间的内容,覆盖到模式空间
G: 将交换空间的内容,追加到模式空间
注释说明:
# sed -i -n '{H // 将首行追加到hold空间:loop // 开启外层循环n;H // 循环读取下一行并追加到hold空间/^}/{ // 如果是最后一行的} 则说明读取结束,打印最终内容x;p // 将hold空间内容交换到模式空间后打印出来}/labels":s*{/!b loop // 如果匹配到labels,则暂停外层循环,为进入内循环准备x // 交换hold空间内容到模式空间,此时labels那一行被进入到hold空间了s/labels":(.*){/labels":1[/g;H // 替换内容后追加到hold空间:loop1 // 开启内层循环n // 逐行读取s/"(.*): (.*)"(.*)/{"key": "1,"val": 2"}3/ // 替换内容H // 追加到hold空间/ }/!b loop1 // 内循环结束x // 交换hold空间内容到模式空间,此时上一个}进入到hold空间s/ }/ ]/g;H // 替换后追加到hold空间b loop // 外层循环结束} ' *.json如上的11和18行前面的x交换就是导致最终生成的文件内容前三行多余的内容。可以将11和18行末尾的H修改为h覆盖掉则没有多余的内容了。如下:
# sed -n '> {> H> :loop> n;H> /^}/{> x;p> }> /labels":s*{/!b loop> x> s/labels":(.*){/labels":1[/g;h> :loop1> n> s/"(.*): (.*)"(.*)/{"key": "1,"val": 2"}3/> H> / }/!b loop1> x> s/ }/ ]/g;h> b loop> } > ' abc
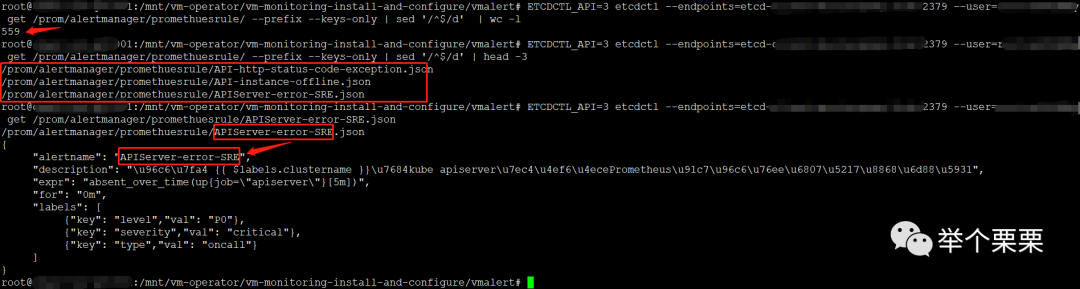
{ "alertname": "xpu-node-oss-ceph-mount-state", "description": "XPU Clusteruff1a{{ $labels.cluster }} nodeuff1a{{ $labels.host }} mount folderuff1a{{ $labels.path }} failureuff0cPlease checkuff01", "expr": "xpu_mount_ossorceph_dir{host=~"orinci.*"} == 0", "for": "1m", "labels": [ {"key": "level","val": "P1"}, {"key": "service","val": "xpu"}, {"key": "severity","val": "error"} ]}第五步:将修改后的json文件批量PUT到etcd中,验证规则生效
// 将告警规则批量导入到etcd# for i in $(ls -lrth *.json | awk '{print $NF}')do ETCDCTL_API=3 etcdctl --endpoints=xxx.xxx.xxx.xxx:2379 --user=user:xxx put /prom/alertmanager/promethuesrule/$i "$(cat $i)"done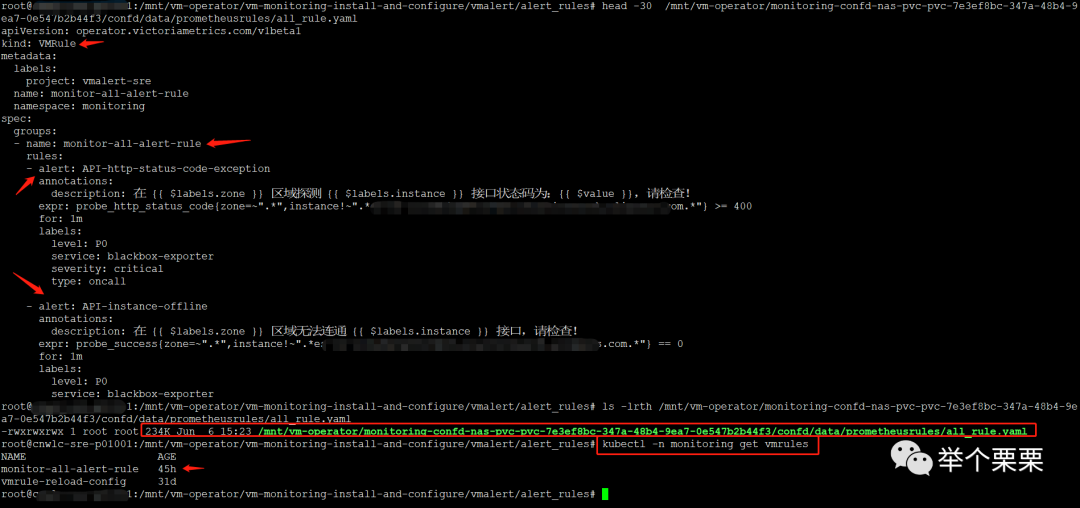
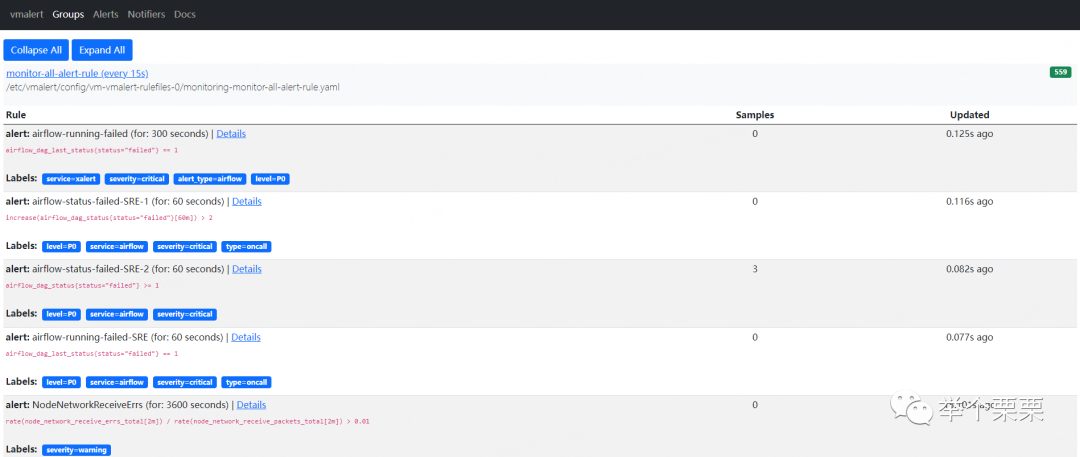
最终,实现了告警规则的改造。自动应用生效。
声明:文中观点不代表本站立场。本文传送门:https://eyangzhen.com/46158.html