0简介


引言
随着嵌入式系统变得越来越复杂,越来越多的设备与互联网相连,为这类系统编写软件的难度也随之增加。现代应用往往需要微妙的平衡:在同时执行多个任务(有严格的时间限制),以及管理复杂的协议,如WiFi、蓝牙、USB、加密……为了处理这种增加的复杂性,纯粹在裸机上编程过于复杂。实时操作系统为常用的功能提供了抽象层,使开发人员能够专注于实际应用本身,而不必从头开始重新实现所有的功能。
在本教程中,我们较少涉及现代RTOS的工作原理,已经有很多书对此进行了广泛的介绍。相反,我们将主要侧重于学习如何使用Zephyr提供的功能。
Zephyr简介
Zephyr RTOS是相对较新的实时操作系统,它提供对各种MCU架构的支持。你可以得到所有常见的内核功能,如线程、信号、互斥等,这些都是其他实时操作系统所提供的(FreeRTOS是另一个流行的选择)。
Zephyr完全开源的,并得到了Linux基金会的支持。其他实时操作系统通常由行业巨头支持,如亚马逊(FreeRTOS)、Azure RTOS(微软)和MbedOS(ARM),存在下线的风险。
Zephyr有独特的构建和配置系统:Kconfig。它允许开发者调整内核的构建过程,并只包括那些被使用的功能(从而减少内存占用)。
Zephyr的更多特点可参见:https://medium.com/geekculture/the-zephyr-rtos-is-awesome-931bce3a695f。
设备准备
- 开发机: 本文以Ubuntu 22.04.2 LTS 为例,也可使用MacOS、Windows等
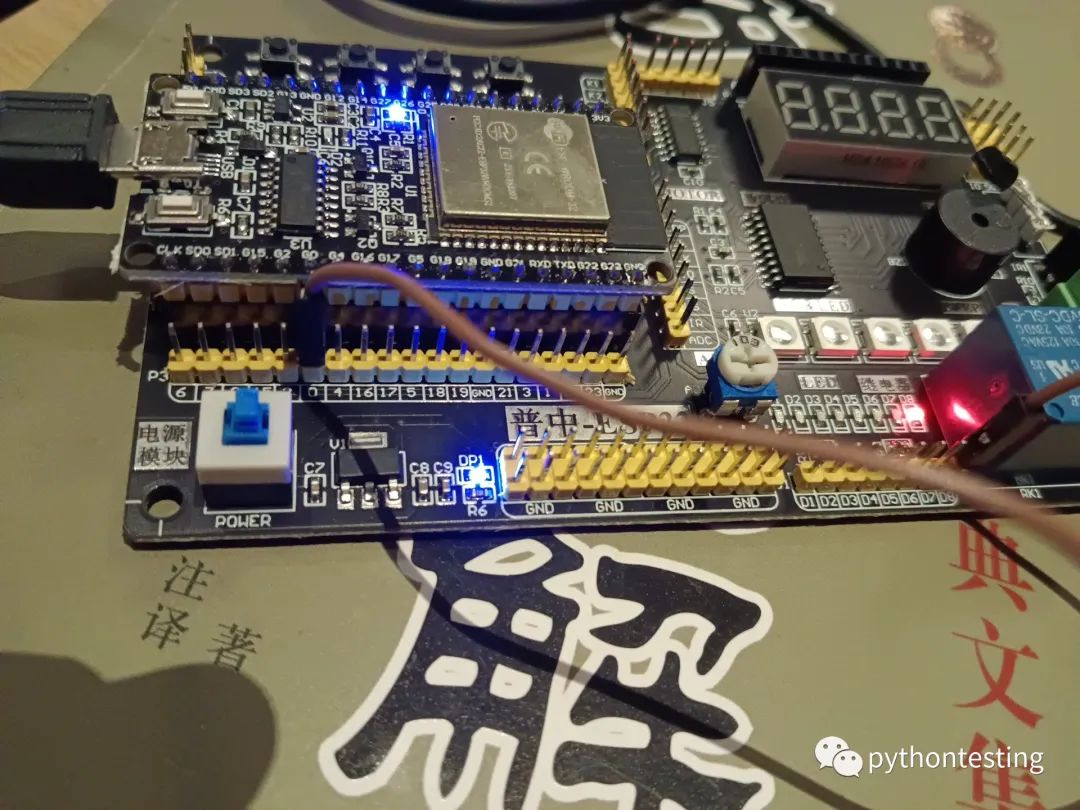
- 开发板: 本文以普中ESP32 为例,也可使用STM32、树莓派等
- 技术基础: Python和C语言基础; 基本的嵌入式电子知识(GPIO、定时器、中断…)。
- 网络:需要频繁访问github,最好有VPN。
1安装
安装依赖
$ sudo apt update
$ sudo apt upgrade
$ wget https://apt.kitware.com/kitware-archive.sh
$ sudo bash kitware-archive.sh
$ sudo apt install --no-install-recommends git cmake ninja-build gperf
  ccache dfu-util device-tree-compiler wget
  python3-dev python3-pip python3-setuptools python3-tk python3-wheel xz-utils file
  make gcc gcc-multilib g++-multilib libsdl2-dev libmagic1
# 校验版本
$ cmake --version # > 3.20.5
$ python3 --version # > 3.8
$ dtc --version # >1.4.6
获取Zephyr并安装Python依赖
$ sudo pip install west
$ sudo west init ~/zephyrproject
$ cd ~/zephyrproject
$ sudo west update
$ sudo west zephyr-export
# sudo pip install -r ~/zephyrproject/zephyr/scripts/requirements.txt
安装Zephyr SDK
Zephyr软件开发工具包(SDK)包含了Zephyr支持的每个架构的工具链,其中包括编译器、汇编器、链接器和其他构建Zephyr应用程序所需的程序。
它还包含额外的主机工具,如自定义的QEMU和OpenOCD构建,用于仿真、闪存和调试Zephyr应用程序。
下载并验证Zephyr SDK捆绑包:
$ cd ~
$ wget https://github.com/zephyrproject-rtos/sdk-ng/releases/download/v0.16.1/zephyr-sdk-0.16.1_linux-x86_64.tar.xz
$ wget -O - https://github.com/zephyrproject-rtos/sdk-ng/releases/download/v0.16.1/sha256.sum | shasum --check --ignore-missing
$ tar xvf zephyr-sdk-0.16.1_linux-x86_64.tar.xz
$ cd zephyr-sdk-0.16.1
$ ./setup.sh
# 以下使普通用户也可以烧录开发板
$ sudo cp ~/zephyr-sdk-0.16.1/sysroots/x86_64-pokysdk-linux/usr/share/openocd/contrib/60-openocd.rules /etc/udev/rules.d
$ sudo udevadm control --reload
参考资料
- 软件测试精品书籍文档下载持续更新 https://github.com/china-testing/python-testing-examples 请点赞,谢谢!
- 本文涉及的python测试开发库 谢谢点赞! https://github.com/china-testing/python_cn_resouce
- python精品书籍下载 https://github.com/china-testing/python_cn_resouce/blob/main/python_good_books.md
- https://docs.zephyrproject.org/latest/samples/index.html#samples-and-demos
- https://maksimdrachov.github.io/zephyr-rtos-tutorial/docs/1-zephyr-setup/install/linux.html
- https://docs.zephyrproject.org/latest/develop/getting_started/index.html
- https://www.zephyrproject.org/zephyr-rtos-on-esp32/ 注意官网文档有错误,west espressif update是不需要执行的。
Hello实例
$ cd ~/zephyrproject/zephyr
$ west build -p always -b esp32 samples/hello_world/
$ west flash
$ west espressif monitor
-p选项进行原始构建。它用于在对CMake做任何修改时进行构建。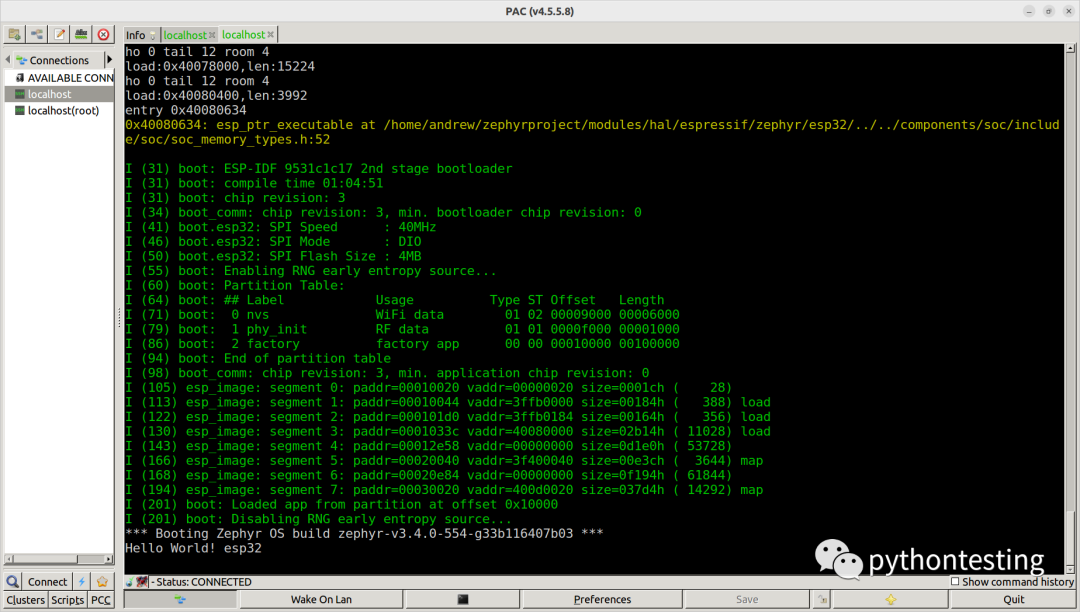
这个例子在串口输出了“Hello World! esp32”
如果出现找不到串口,则需要安装esp32驱动,参考:https://askubuntu.com/questions/1389189/how-to-use-esp32-wrover-b-with-ubuntu#:~:text=You have to check cable%2C this driver is,dialout group%3A sudo usermod -a -G dialout %24USER
$ sudo apt-add-repository universe
$ sudo apt-get update
$ sudo apt-get install esptool
$ sudo usermod -a -G dialout $USER # 注意替换成具体用户名
源码:main.c
#include <zephyr/kernel.h>

int main(void)
{
	printk("Hello World! %sn", CONFIG_BOARD);
	return 0;
}
blinky
$ vi zephyr/samples/basic/blinky/esp32.overlay # 没有会报错:devicetree.h:237:32: error: ‘DT_N_ALIAS_led0_P_gpios_IDX_0_VAL_pin’ undeclared here (not in a function)
 /{
     aliases {
             led0 = &myled0;
     };

     leds {
             compatible = "gpio-leds";
             myled0: led_0 {
                     gpios = <&gpio0 0 GPIO_ACTIVE_LOW>;
             };
     };
};

$ west build -p -b esp32 samples/basic/blinky
$ west flash
$ west espressif monitor
源码:main.c
#include <zephyr/kernel.h>
#include <zephyr/drivers/gpio.h>

/* 1000 msec = 1 sec */
#define SLEEP_TIME_MS   10000

/* The devicetree node identifier for the "led0" alias. */
#define LED0_NODE DT_ALIAS(led0)

/*
 * A build error on this line means your board is unsupported.
 * See the sample documentation for information on how to fix this.
 */
static const struct gpio_dt_spec led = GPIO_DT_SPEC_GET(LED0_NODE, gpios);

int main(void)
{
	int ret;

	if (!gpio_is_ready_dt(&led)) {
		return 0;
	}

	ret = gpio_pin_configure_dt(&led, GPIO_OUTPUT_ACTIVE);
	if (ret < 0) {
		return 0;
	}

	while (1) {
		ret = gpio_pin_toggle_dt(&led);
		if (ret < 0) {
			return 0;
		}
		k_msleep(SLEEP_TIME_MS);
	}
	return 0;
}
声明:文中观点不代表本站立场。本文传送门:https://eyangzhen.com/146566.html